Financial Data Quality Management Enterprise Edition (FDMEE) and Oracle Data Integrator (ODI) are useful products with lots of features. The various menus, options, and setup screens within FDMEE and ODI can be overwhelming. Which is why I was intimidated when initially challenged with the task of leveraging FDMEE parameters to filter data sets, but the task turned out to be a great learning experience. Going through the process really helped me gain a better understanding of the relationship between FDMEE and ODI objects.
NOTE: The steps below will not walk through installing or setting up FDMEE. The assumption is that the environment is already setup and running with working source and targets.
OBJECTIVE
Provide users with the option of filtering data based on account type. In this particular example, users can choose to include or exclude Income Statement accounts in their data load.
- Accounts (Level 0) are 5 digit numbers
- Non-Income Statement Accounts (Balance Sheet) begin with 1,2,3,4
Step 1: Add Parameter to a Source Adapter (FDMEE)
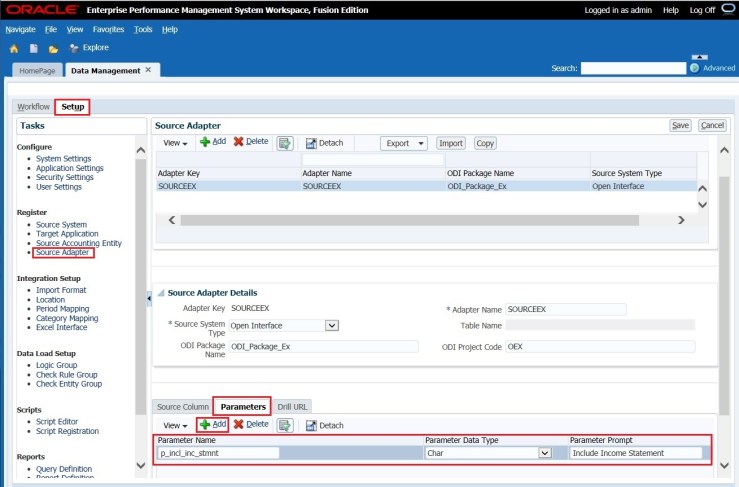
A. On the Setup tab, click on Source Adapter
B. Select the desired Source Adapter (SOURCEEX in this example)
C. On the Parameters tab, click on Add
D. Parameter Name: p_incl_inc_stmnt
E. Parameter Data Type: Char
F. Parameter Prompt: Include Income Statement
Step 2: Make Note of Source Adapter Details (FDMEE)
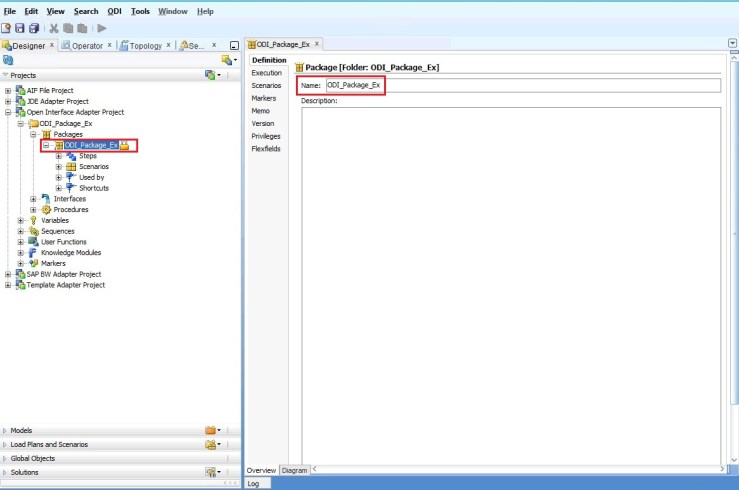
A. ODI Package Name: ODI_Package_Ex
B. ODI Project Code: OEX

Step 3: Input Value into Parameter (FDMEE)
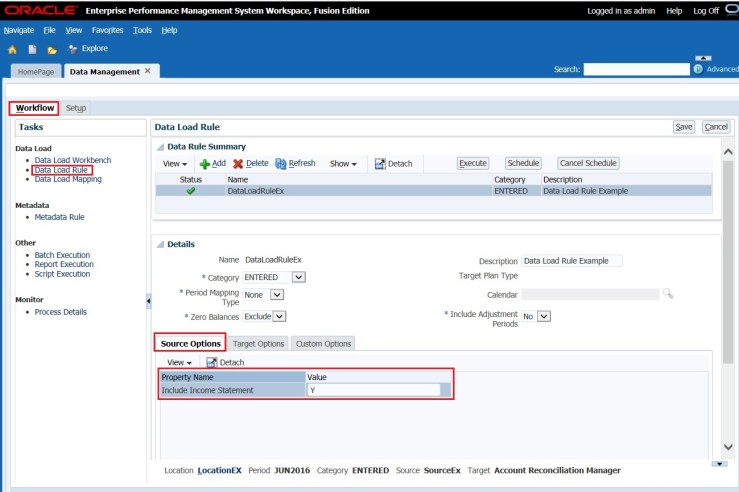
A. On the Workflow tab, click on Data Load Rule
B. Select the desired POV (Location: LocationEX in this example)
– Location selected must be setup with the Source associated with the Source Adapter the Parameter was added to in Step 1.
C. On the Source Options tab, notice the “Include Income Statement” property
– This will mirror the value entered in Step 1F > Parameter Prompt: Include Income Statement
D. Include Income Statement: Y
– Y = Yes, Include Income Statement Accounts
-N = No, exclude Income Statement Accounts
Step 4: Locate the Appropriate ODI Project (ODI)
A. On the Designer tab, locate the ODI Project that correlates to the ODI Project Code associated with the Source Adapter from Step 2B > ODI Project Code: OEX

Step 5: Add ODI Project Variable (ODI)
A. On the Designer tab, expand the Project folder identified in Step 4
B. Add a new ODI Project Variable: p_incl_inc_stmnt
– Name: p_incl_inc_stmnt
* To keep things simple, set the variable name to mirror the value entered in Step 1D > Parameter Name: p_incl_inc_stmnt
– Datatype: Alphanumeric
– Keep History: Latest Value (Default, feel free to change)
– Default Value: 0 (Leave blank or set to Y or N)

Step 6: Link ODI Project Variable to FDMEE Source Adapter Parameter (ODI)
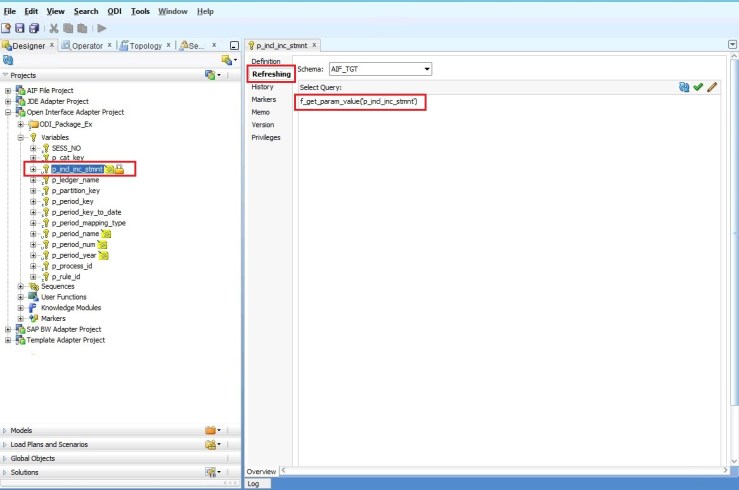
A. On the Refreshing menu of the ODI Project Variable created in Step 5, select the appropriate Schema and enter the following code into the Select Query window:
f_get_param_value(‘p_incl_inc_stmnt’)
– This reference to ‘p_incl_inc_stmnt’ in the code above is a direct reference to the FDMEE Source Adapter Parameter created in Step 1 > Parameter Name: p_incl_inc_stmnt
Step 7: Locate the Appropriate ODI Package (ODI)
A. On the Designer tab, locate the ODI Package that correlates to the ODI Package Name associated with the Source Adapter from Step 2A > ODI Package Name: ODI_Package_Ex
Step 8: Add the ODI Project Variable to the Appropriate ODI Package (ODI)
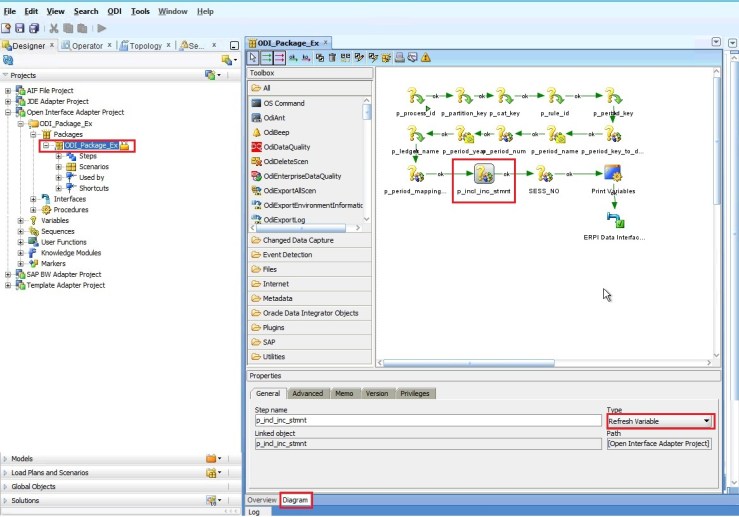
A. Click on the Diagram tab of the ODI Package identified in Step 7.
B. Add the ODI Project Variable p_incl_inc_stmnt from Step 5 & 6
C. Variable Type: Refresh Variable
D. Order and link variable to other package objects as desired
Step 9: Modify the ODI Interface to Include Filter (ODI)
A. Click on the Diagram tab of the ODI Package identified in Step 7.
B. Identify the appropriate ODI Interface that is responsible for the data load into FDMEE (ERPI Open Interface to ERPI Balances in this example)
C. Create the filter on the source column that houses Accounts (COL01 in this example)
– Input suitable code / logic to achieve the desired filter results, I leveraged the following code for the filter:

– Based on the above logic:
* If the Parameter Value in Step 3D was set to ‘Y’ then all accounts would be considered VALID (part of the data result set)
* If the Parameter Value in Step 3D was set to ‘N’ then only accounts beginning with a 1,2,3 or 4 would be considered VALID (part of the data result set)

Step 10: Regenerate ODI Scenario
To ensure the change is stored in the Scenario when FDMEE executes, be sure to regenerate the ODI Scenario corresponding to the modified package.
Once all the FDMEE and ODI objects have been successfully setup and saved, the user will then be able to filter the data set by updating the parameter value on the Data Load Rule menu in FDMEE and clicking on the Execute button.
This is just one example of how to leverage FDMEE Source Adapter Parameter, there are numerous ways to utilize this cool feature!


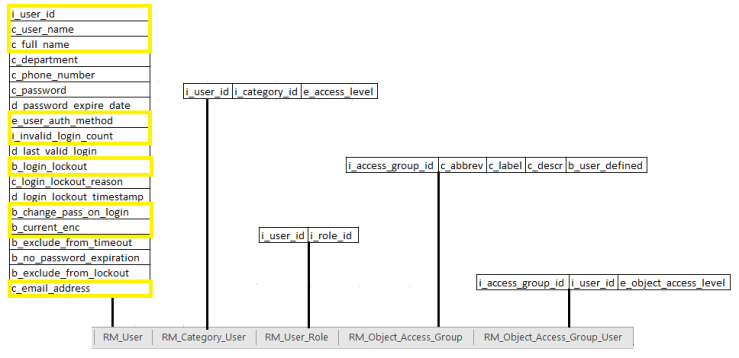
 I chose to create the data files for each table with specific fields in separate tabs within Excel, as shown below: